Introduction
Wiring a house is one of the most critical aspects of building or renovating a home. A well-designed electrical system ensures safety, efficiency, and convenience, providing power for lighting, appliances, and essential devices. Whether you’re a homeowner looking to understand the process or an aspiring electrician, learning the fundamentals of house wiring is crucial. From planning to installation, each step plays a vital role in creating a reliable electrical setup that meets safety standards.
Wiring a house is a crucial step in ensuring a safe and efficient electrical system. Whether you’re building a new home or upgrading an existing one, understanding the fundamentals of electrical wiring is essential. This guide will walk you through the process, covering planning, materials, installation, and safety precautions.
1. Planning the Electrical System
Before starting the wiring process, careful planning is necessary. Consider the following:
- Electrical Load Calculation: Determine the total power consumption of appliances and lighting to ensure the system can handle the load.
- Circuit Design: Plan separate circuits for lighting, outlets, and heavy appliances to prevent overloads.
- Code Compliance: Follow local electrical codes and regulations to ensure safety and legality.
- Outlet and Switch Placement: Strategically place outlets and switches for convenience and accessibility.
2. Gathering Materials and Tools
To wire a house, you’ll need the following materials and tools:
Materials:
- Electrical wires (various gauges)
- Circuit breakers
- Electrical boxes
- Switches and outlets
- Conduit pipes
- Wire connectors
- Grounding rods
Tools:
- Wire strippers
- Voltage tester
- Drill and screwdriver
- Pliers
- Electrical tape
- Measuring tape
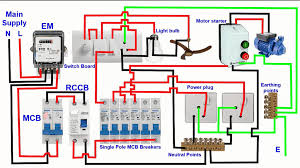
3. Installing the Main Electrical Panel
The main electrical panel is the heart of the wiring system. Follow these steps:
- Choose a Location: Install the panel in a dry, accessible area.
- Connect the Main Power Supply: Run the main service cable from the utility meter to the panel.
- Install Circuit Breakers: Assign breakers to different circuits based on power requirements.
- Label Each Circuit: Clearly mark each breaker for easy identification.
4. Running Electrical Wires
Proper wiring ensures efficiency and safety. Follow these steps:
- Drill Holes in Studs: Create pathways for wires through walls and ceilings.
- Run Cables to Outlets and Switches: Secure wires using staples or conduit pipes.
- Connect Wires to Electrical Boxes: Strip insulation and attach wires to terminals.
- Ensure Proper Grounding: Connect grounding wires to prevent electrical hazards.
5. Installing Outlets and Switches
- Mount Electrical Boxes: Secure boxes at appropriate heights.
- Connect Wires: Attach hot, neutral, and ground wires to terminals.
- Secure Outlets and Switches: Screw them into place and cover with faceplates.
- Test Connections: Use a voltage tester to ensure proper functionality.
6. Setting Up Lighting Fixtures
- Choose Fixture Locations: Install lights in key areas for optimal illumination.
- Run Wires to Fixtures: Connect wires from switches to light fixtures.
- Secure Fixtures: Mount lights and ensure proper insulation.
- Test the System: Verify that lights turn on and off correctly.
7. Safety Precautions
Electrical work requires strict safety measures:
- Turn Off Power: Always shut off electricity before working on wiring.
- Use Insulated Tools: Prevent accidental shocks with proper tools.
- Follow Code Regulations: Ensure compliance with local electrical codes.
- Avoid Overloading Circuits: Distribute power evenly across circuits.
8. Final Testing and Inspection
Once wiring is complete:
- Conduct a Thorough Inspection: Check all connections for errors.
- Test Each Circuit: Ensure outlets, switches, and fixtures function properly.
- Obtain Approval: Have an electrician or inspector verify compliance.
How to Wire a House: A Comprehensive Guide
Wiring a house is a crucial step in ensuring a safe and efficient electrical system. Whether you’re building a new home or upgrading an existing one, understanding the fundamentals of electrical wiring is essential. This guide will walk you through the process, covering planning, materials, installation, and safety precautions.
1. Planning the Electrical System
Before starting the wiring process, careful planning is necessary. Consider the following:
- Electrical Load Calculation: Determine the total power consumption of appliances and lighting to ensure the system can handle the load.
- Circuit Design: Plan separate circuits for lighting, outlets, and heavy appliances to prevent overloads.
- Code Compliance: Follow local electrical codes and regulations to ensure safety and legality.
- Outlet and Switch Placement: Strategically place outlets and switches for convenience and accessibility.
2. Gathering Materials and Tools
To wire a house, you’ll need the following materials and tools:
Materials:
- Electrical wires (various gauges)
- Circuit breakers
- Electrical boxes
- Switches and outlets
- Conduit pipes
- Wire connectors
- Grounding rods
Tools:
- Wire strippers
- Voltage tester
- Drill and screwdriver
- Pliers
- Electrical tape
- Measuring tape
3. Installing the Main Electrical Panel
The main electrical panel is the heart of the wiring system. Follow these steps:
- Choose a Location: Install the panel in a dry, accessible area.
- Connect the Main Power Supply: Run the main service cable from the utility meter to the panel.
- Install Circuit Breakers: Assign breakers to different circuits based on power requirements.
- Label Each Circuit: Clearly mark each breaker for easy identification.
4. Running Electrical Wires
Proper wiring ensures efficiency and safety. Follow these steps:
- Drill Holes in Studs: Create pathways for wires through walls and ceilings.
- Run Cables to Outlets and Switches: Secure wires using staples or conduit pipes.
- Connect Wires to Electrical Boxes: Strip insulation and attach wires to terminals.
- Ensure Proper Grounding: Connect grounding wires to prevent electrical hazards.
5. Installing Outlets and Switches
- Mount Electrical Boxes: Secure boxes at appropriate heights.
- Connect Wires: Attach hot, neutral, and ground wires to terminals.
- Secure Outlets and Switches: Screw them into place and cover with faceplates.
- Test Connections: Use a voltage tester to ensure proper functionality.
6. Setting Up Lighting Fixtures
- Choose Fixture Locations: Install lights in key areas for optimal illumination.
- Run Wires to Fixtures: Connect wires from switches to light fixtures.
- Secure Fixtures: Mount lights and ensure proper insulation.
- Test the System: Verify that lights turn on and off correctly.
7. Safety Precautions
Electrical work requires strict safety measures:
- Turn Off Power: Always shut off electricity before working on wiring.
- Use Insulated Tools: Prevent accidental shocks with proper tools.
- Follow Code Regulations: Ensure compliance with local electrical codes.
- Avoid Overloading Circuits: Distribute power evenly across circuits.
8. Final Testing and Inspection
Once wiring is complete:
- Conduct a Thorough Inspection: Check all connections for errors.
- Test Each Circuit: Ensure outlets, switches, and fixtures function properly.
- Obtain Approval: Have an electrician or inspector verify compliance.
Conclusion
Wiring a house is a complex but rewarding task that ensures a safe and efficient electrical system. By following proper planning, installation, and safety measures, you can create a reliable setup that meets your household needs. If you’re unsure about any step, consulting a professional electrician is always recommended.