Changing or installing a light switch power sound like the kind of article you essential an electrician for—but in many cases, it’s totally achievable on your own with the right tools, tolerance, and knowledge. It’s not just about connecting wires; it’s about doing it safely and positively.
So if you’re someone who wants to save a little money, learn a new skill, or simply feel more in control of your own home—this leader is for you.
Let’s walk through it together, one safe step at a time.
🧠 First Things First: Understand the Basics
Before we jump into screwdrivers and wire nutty, it helps to know what you’re actually working with.
🔌 What’s a Light Switch?
A light switch is a device that controls the electrical current to a light feature. When it’s “on,” electricity flows. When it’s “off,” the circuit is broken and the light goes dark.
⚠️ Why Safety Matters
Even still light switch wiring is a pretty simple task likened to some electrical work, it still includes high voltage. A mistake could lead to shock, short circuits, or even fire. So before you touch anything, promise to doing this with care and deference for the power you’re working with.
🧰 Tools and Materials You’ll Need
Let’s make sure you’ve got everything in place before you get started:
- A new light switch (single-pole, three-way, or dimmer—depending on your setup)
- Screwdrivers (Phillips and flat-head)
- Voltage tester or multimeter (non-negotiable)
- Wire strippers
- Needle-nose pliers
- Electrical tape
- Wire nuts
- Flashlight or headlamp (just in case power’s off for a while)
Optional but helpful:
- Labeling tape or marker
- Wall plate (if you’re updating the cover too)
- Safety gloves
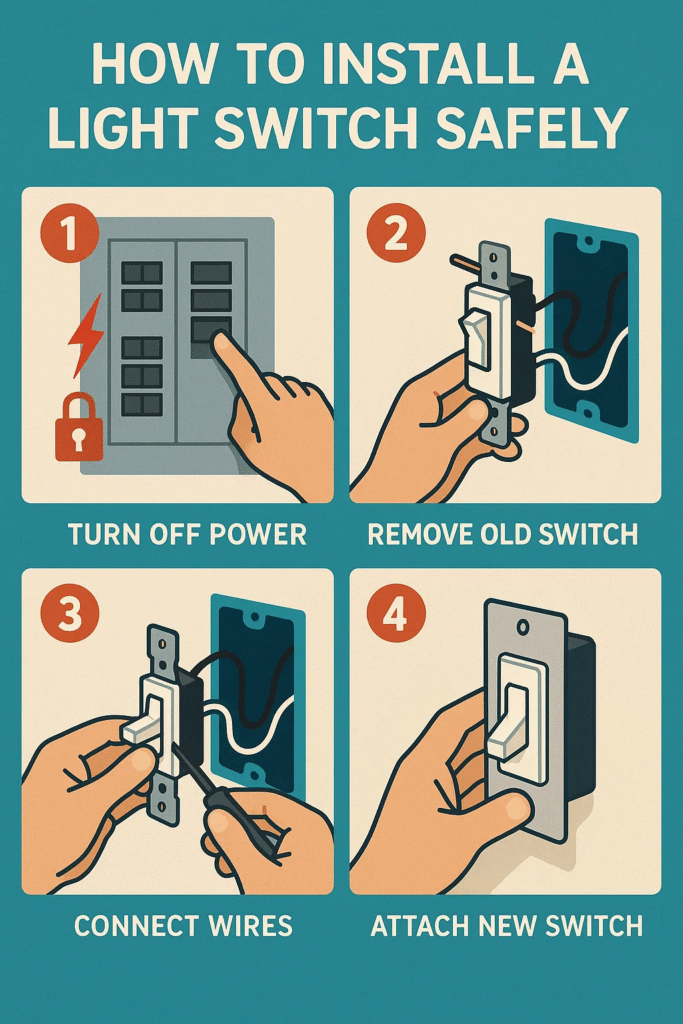
🛑 Step 1: Cut the Power at the Breaker
Don’t trust on just flicking the switch off—go to your circuit breaker and shut off power to the switch you’re working on. If you’re not sure which one it is, label them for future reference.
Once the power is off at the panel, test it at the switch with a voltage tester. This is critical. Never assume it’s safe—test, test, and test again.
🧱 Step 2: Remove the Switch Cover and Inspect
Use your screwdriver to remove the cover plate, and then unscrew the old switch from the electrical box.
Pull the switch out lightly so you can get a good look at the wires. Depending on how your switch was installed, you might see:
- Two black wires (hot wires)
- A bare copper or green wire (ground)
- In some homes, a white wire (neutral), though this is less common with simple switches
🧼 Step 3: Double Check the Voltage Again
Even yet the breaker is off and you already checked earlier, test the wires again using your voltage tester. Think of this as a seatbelt check. It only takes two seconds and could save your life.
🧩 Step 4: Disconnect the Old Switch
Loosen the screws or remove the wires from the push-in holes, depending on your old switch type. Take your time here—don’t yank anything.
If wires are bent out of shape or nicked, trim and re-strip about ½ inch of insulation using your wire stripper. Clean wire connections make for safer, more secure installations.
⚙️ Step 5: Connect the New Switch
Depending on whether your switch is single-pole (controls one light from one location) or three-way (controls a light from two different locations), the connection process will differ slightly.
🔹 For a Single-Pole Switch:
- Connect the two black (hot) wires to the two brass-colored screws on the new switch. It doesn’t matter which one goes where.
- Award the bare copper (or green) ground wire to the green grounding screw.
- Gently tuck the wires back into the box, creation sure nothing is pinched or strained.
🔹 For a Three-Way Switch:
- Identify the common wire (usually black, or labeled “common”).
- Connect it to the black screw on the switch.
- Connect the two remaining traveler wires to the two brass or light-colored screws.
- Connect the ground wire as usual.
Label your wires before disconnecting the old switch if you’re unsure—that way, you can match them suitably on the new switch.
🔩 Step 6: Secure the Switch and Cover Plate
Once your cabling is done, carefully push the switch back into the box. Screw it in so it sits even with the wall, but don’t overtighten or you could crack the switch or plate.
Now put the faceplate back on. It’s like giving your hard work a clean finishing touch.
⚡ Step 7: Restore Power and Test
Go back to your breaker box and turn the power back on.
Now comes the best part—test your switch. If the light turns on and off smoothly, you’re golden. If it doesn’t work, don’t panic—turn off the power again and double-check your connections.
If it still doesn’t work and you’re stumped, call a licensed electrician. There’s no shame in asking for help—your safety comes first.
✨ Extra Tips for First-Timers
- Label your breakers while you’re at it. It’ll make future DIY projects easier.
- Use a flashlight if the room has no natural light.
- Double-check your switch type before buying replacements. Single-pole and three-way switches look similar, but function differently.
- Inspect your wires—if anything looks brittle, corroded, or damaged, consider calling a professional.
🧠 What About Dimmer Switches?
If you’re installing a dimmer instead of a standard light switch, the steps are mostly the same—but dimmers sometimes come with extra wires, especially if they support multiple lighting styles (like LEDs or incandescents).
Always check the instructions included with your dimmer model. Some dimmers also require a neutral wire—if your box doesn’t have one, you may need to use a compatible product or consult an electrician.
🔎 Troubleshooting Common Issues
- Switch clicks but doesn’t turn on the light: Check your bulb and your wiring.
- Lights flicker: Could be a loose wire connection or an issue with the light fixture itself.
- Sparks when flipping the switch: You may have a short circuit—turn off the power and inspect immediately.
- Breaker trips repeatedly: This could point to overloading or a serious wiring fault. Time to call the pros.
📦 Final Words: Confidence with Caution
Installing a light switch isn’t rocket science—but it’s not a task to take lightly either (pun intended). Treat electricity with caution, follow each step carefully, and take your time.
Done right, it’s incredibly satisfying to flip that switch and know you made it happen. Plus, now you’ve unlocked a skill that might just make you the go-to DIY’er in your circle.
✅ Conclusion:
Installing or substituting a light switch might seem like a small upgrade, but it’s a giant win when it comes to feeling authorized in your own space. You’ve just handled electricity—something most people cautious absent from—with care, endurance, and knowledge. That’s a big deal.
Sure, it wasn’t just about tightening screws or matching wires. It was about trusting yourself to do it safely and correctly. And smooth more than that—it’s about building confidence one skill at a time.
The next time a light glimmers or a switch needs replacing, you won’t vacillate. You’ve been there. You’ve done that. And you’ve done it right.